I got you
I have a PNG image with a bit depth of 64 bits. Awesome. . .
2020.08.15 (Sat), When I took a look at the PNG image rendered with Blender (freestyle, 3840×2160, RGB, color depth 16bit, compression rate 100%), it was quite large, exceeding 5MB.
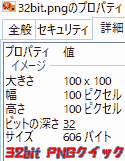
When I [right-clicked] those .PNGs and looked at [Properties] → [Details], I found that the bit depth was 64 bits.
Even in the best BB material I’ve seen, most bit depths were 32 bits.
I thought I could do this with Photoshop, which I always use, so I looked into how to convert PNG to 64bit, but I couldn’t find any information.
So, when I saved and exported the image as a sample PNG in Photoshop,
I succeeded in saving PNG images at bit depths of 64bit and 48bit.
By doing this, you will be one step closer to generating high-resolution PNG images.
This time, I will show you how to save PNG images with 32-bit, 48-bit, and 64-bit bit depth in Adobe Photoshop.
PNG bit depth
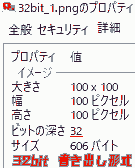
Save as PNG color depth 32bit
- Canvas size: 100x100px
- Screen resolution: 72dpi
- Create a new canvas or open an image.
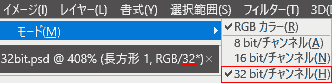
- Select Image → Mode → [32ビットチャンネル].
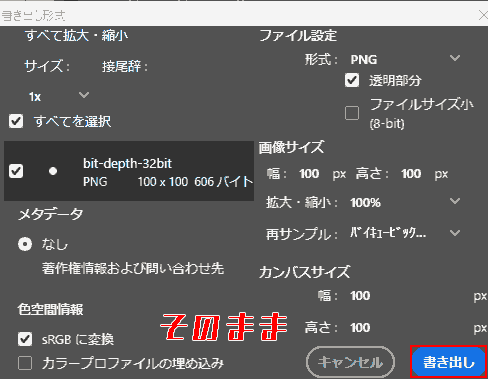
- [Export] → [Quick export as PNG[PNGとしてクイック書き出し]] or [Export format…]
2.1 [Quick export as PNG][PNGとしてクイック書き出し] → [Save as].
2.2 [Export format…] [Export] → [Save] as is.
Saving is now complete.
- Right-click on the .png → [Properties] → [Details] → Check [Bit Depth].
 |
 |
|---|---|
| Bit depth 32bit PNG click export | Bit depth 32bit Export format… |
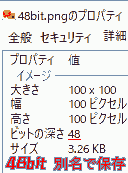
Save as PNG color depth 48bit
- Canvas size: 100x100px
- Screen resolution: 72dpi
- Select [Image] → [Mode (M)] → [16bit/Channel (N)][16bit/チャンネル(N)].
1.1 Nothing special when changing from [8bit][8bit] to [16bit][16bit]
1.2 When changing from [32bit][32bit] to [16bit][16bit]

Reducing the bitness of your document will affect the appearance of your HDR layered images. Combine layers before changing bit depth?
I want to maintain a clean state when reducing the number of bits, so I use [Merge].
[HDRトーン]
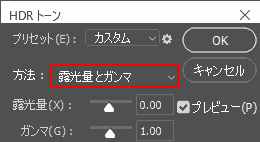
[HDRトーン]If you set it as follows, it doesn’t seem to be much different from 32bit.
- Preset: [Custom]
- Method: [Exposure light and gamma]
- Exposure light (X) [0 .00]
- Gamma (G) [1 .00]
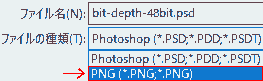
- [File (F)] → [Save As (A)…]

- Change [Save as type] [Photoshop(.PSD,.PDD,.PSDT)] to [PNG(.PNG,*.PNG)] and then [Save].
Saving is now complete.
- Right-click on the .png → [Properties] → [Details] → Check [Bit Depth].
 |
|---|
| Bit depth 48bit Save as |
Save as PNG color depth 64bit
This is the method I found this time.
It is possible that there is a setting that requires saving in 64 bit.
*Caution: This will place a load on your computer.
- Select [Image] → [Mode] → [16bit/channel][16bit/チャンネル].
- Please increase the canvas size and screen resolution as much as possible.
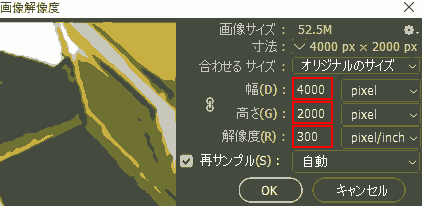
Setting Example
- Canvas size: 4000×2000 px
- Screen resolution: 300dpi
- Keep your images complex.
Success
- Many layers (3 or more)
- Multicolor system
If you do not clear the following, you will fail quite a lot.
Failure
- Less layers
- Monochromatic
- [File (F)] → [Save As (A)…]
I think it’s easier to succeed if it takes longer than normal storage.
- Right-click on the .png → [Properties] → [Details] → Check [Bit Depth].
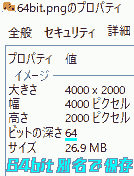 |
|---|
| Bit depth 64bit Save as |
When the bit depth becomes 64bit class, the file size becomes more than MB.
16-bit multiple documents are marked with a #

However, this is not necessarily the case as it was possible to output PNG in 64bit even with RGB/16.
I think 32 bit is basically fine.
- Illustration/Game: 32bit
- Web:8bit
With this method, it takes a lot of effort to save in higher than 32 bits.
I don’t think it’s okay to be that nervous.
If you are particular about it, it is better to use other image formats for higher quality.
dds,tga,tiff etc.
Reference
Operating Environment
- Windows 10 Pro
- Adobe Photoshop
CC 2020