Do you get the error “A low-level exception occurred in ImporterMPEG” and resetting the plugin cache and preferences doesn’t fix it?
Background
On December 24, 2019, I was shooting a mkv format video with OBS Studio, but when I dragged and dropped it to Premiere Pro, I got this error.
After resetting the plugin cache and preferences, the problem seemed to be fixed.
However, when I played the video in Premiere Pro, this error recurred.
Even with gg, I couldn’t find a solution, so here is a method I found through trial and error.
The goal is to convert videos almost without loss.
Error contents
 |
 |
| A low-level exception occurred in: ImporterMPEG (Importer:25) | A low-level exception occurred in: ImporterMPEG (Importer:25) |
| Center of screen | Bottom right of screen |
Cause
When the error occurs
・When adding legacy titles
・When adding a video to the project timeline in Premiere Pro.
・When playing a video in Premiere Pro.
I get an error like this, but to be honest, I don’t know the exact cause. . .
In my case, I can’t be sure, but there were two problems with the .mov video file taken with my iPhone.
Hypothesis
After I deleted the video in question from the Premier Pro project’s timeline, the error no longer occurred.
That’s why I think that the video file may be corrupted.
Even if the video player can be played, the video file itself may be corrupted for some reason.
Approach
1. Reset preferences and plugin cache
2. Convert videos with almost no loss (the method used by Koushi)
3. Update or downgrade Premier Pro
4. Uncheck “Enable hardware-accelerated decoding”
There is more than one solution.
The fix I suggest is to convert the video with almost no loss.
Solution 1: Reset plugin cache and preferences
The second method is to reset the plugin cache and environment settings.
Let’s try it.
Start Premiere Pro by holding down Shift + Alt on Windows or Shift + Option on Mac.
Then the following message window will appear.

Warning
Are you sure you want to reset the plugin cache and preferences?
You will be asked, so select “OK”.
It should now be reset.
If the dll plugin is included, it will start loading.
Now, open the project from earlier, drag and drop the video, and check if there are any errors.
After that, the error message disappeared, but the same error reappeared later in my environment.
For some people this may fix it, for others it may not.
Solution 2A: ”Xmedia Recode”, which converts videos almost without loss of quality
From here on, I will continue talking for those who were not able to fix the problem using solution 1.
If Solution 1 does not fix the problem, the video file may be corrupted.
So, I dealt with it in the following way.
Please note that this is my own method.
Even if the video file can be played normally, there may be a problem with the video itself.
The method is to convert the video with almost no loss.
There is software that can be used to convert the video.
It is a free video conversion software called Xmedia Recode.
- Download and install Xmedia Recode.
XMedia Recode – Video Converter

The format of the video file targeted this time is mkv, so I will explain the process of converting from mkv to mp4.
- Drag and drop the video with the error into Xmedia Recode.
- Select the video and click “Add to list”.
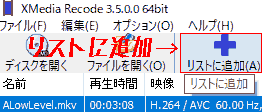
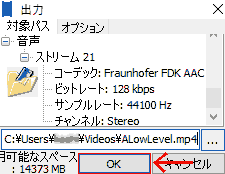
Decide the output destination after conversion and click OK.
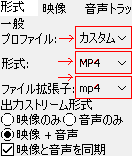
- Configure conversion settings.
Format:
- General
- Profile: Custom
- Format: MP4
- File extension: mp4
- Mux
- Streaming – Fast Start
- Output stream format: video only, audio only, ☑video+audio
- Synchronize video and audio: ☑ Check.
Video: General > Mode: “Convert” → Copy.
Selecting “Copy” literally “duplicates” the item.
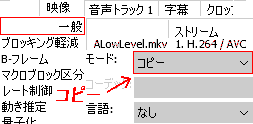
Audio track 1:
- General: Mode: “Convert” → Copy.
The audio track will also be “duplicated” in the same way.

Other settings do not need to be changed.
4. Perform video conversion with “Encode”.

This is the screen during encoding.
- Job: Number of videos to convert. Videos can be converted in batches. (If you actually try it, you can convert as many as 200 items.)
- CPU priority: Idle, Below Standard, Standard, Above Standard, High, Real Time
- Encoding will be fastest if done in real time.
- Action on completion: Do nothing, restart, shutdown, logoff, standby, program exit
- It’s okay to just “do nothing”.
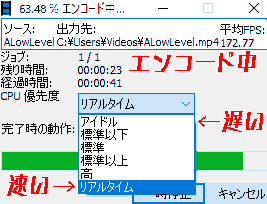
When the message “Media file created!” appears, the converted video file (.mp4) will be created in the output destination you set earlier.

Move it to your project folder.
- Please replace (replace) the video you are editing and check if there are any errors.
I was able to target this error this way.
Solution 2B: “Avidemux”, which converts videos almost without loss of quality
In addition to Xmedia Recode, I was also able to fix it with Avidemux.
I will explain if you want to fix a video using Avidemux.
- First, download and install Avidemux.
- Drag and drop your videos.
- Set the output as follows.
- Video Decoder:DXVA2
- Video Output:Copy
- Audio Output:Copy
- Output Format:MP4 Muxer
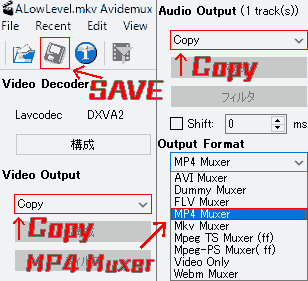
- SAVE. The conversion finished faster than Xmedia Recode.
Now, drag and drop the video to Premier Pro and check if there are any errors.
In my case, I was able to fix it with Avidemux.
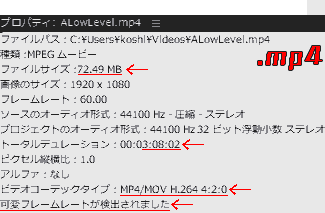
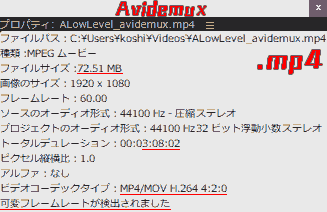
About the difference before and after conversion
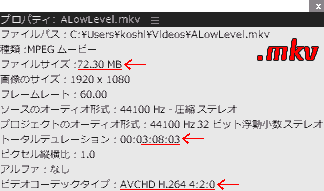
This section explains the difference between video information before and after video file conversion.
 |
 |
 |
|---|---|---|
| Before conversion .mkv | After conversion .mp4(Xmedia Recode) | After conversion .mp4(Avidemux) |
| Properties | ALowLevel.mkv | ALowLevel.mp4(Xmedia Recode) | ALowLevel.mp4(Avidemux) |
|---|---|---|---|
| File Path | – | – | – |
| Type | MPEG movie | MPEG movie | MPEG movie |
| File Size | 72.30 MB | 72.49 MB | 72.51 MB |
| Image Size | 1920×1080 | 1920×1080 | 1920×1080 |
| Frame Rate | 60.00 | 60.00 | 60.00 |
| Source audio format | 44100Hz compression stereo | 44100kHz compression stereo | 44100kHz compression stereo |
| Project audio format | 44100Hz 32-bit floating point stereo | 44100Hz 32-bit floating point stereo | 44100Hz 32-bit floating point stereo |
| Total Duration | 00:03:08:03 | 00:03:08:02 | 00:03:08:02 |
| Pixel Aspect Ratio | 1.0 | 1.0 | 1.0 |
| Alpha | None | None | None |
| Video codec type | AVCHD H.264 4:2:0 | MP4/MOV H.264 4:2:0 | MP4/MOV H.264 4:2:0 |
| Variable frame rate detected | Variable frame rate detected |
As you can see from the table above, there was a slight difference between the data of the original video and the data.
The file after conversion is compared to before conversion.
- The file size has become a little larger.
- The total duration has become a little shorter.
- The video codec type has changed from ACVHD to MP4/MOV.
- I got a message saying “Variable frame rate detected“.
Looking at this result, I personally think that I was able to convert it with almost no deterioration.
Actually, I want to use the original video file, but I gave up thinking “This video file is no longer good”, converted the video in a form that is close to lossless, and used the converted video file. I think it would be better to focus on completing the video project itself as quickly and efficiently as possible.
Please try this method only if nothing else works.
Others: Suggestions for countermeasures
- Use other video lossless conversion software Example: Video Container Changer
- Converting a video file format to another format (possible deterioration) Example: .mov→.mp4
- Use ordinary video conversion software Example: VLC Media Player
- Perform video conversion twice
- When transferring from iPhone to Windows, be careful when copying files.
- Update Premiere Pro to the latest version or downgrade Premiere Pro to an older version
- Play the video on a large screen and capture the screen using OBS Studio, Geforce Experience, etc.
- Preferences> Media> Uncheck Enable hardware accelerated decoding (requires restart)

Lastly
We have shown how to deal with the error “A low-level exception occurred in ImporterMPEG” in Premier Pro.
I was able to avoid this error by converting the potentially corrupt video file to another format without any loss.
I think this approach can be applied to other things as well.
For example,
- “Unable to play video with video player”
- “Video files are not recognized when moving videos from Windows to Mac”
Etc. You might want to try the workaround I introduced this time just in case.
Anyway, I’m glad you were able to fix it!
Operating Environment
- OS:Windows10 Pro
- Application: Adobe Premiere Pro CC 2019 v13.1.2 (Build 9)
- App used:
